Open top menu

Labels

Aug 29, 2011
no image


Best Google Tricks.


Did you know that you can use Google for…
  1. Track flight status Do you want to know what time your flight leave? Here is what you have to write: [your company name] flight [your flight number] Ex: british airways flight 354
  2. Get the local time from any city or location in the world If you want to know the time is in a certain city, write this sentence: what time is it [write here the name of the city] Ex: what time is it New York
  3. Convert everything into anything else Google is the most powerful converter and calculator ever invented. Did you know? You can convert currencies, metrics, number etc. Here are a few examples:
  4. Compare things How many times have you wished to know if something is better than something else? Here is the solution: “better than [write you what you want to compare]” Ex: “better than norton antivirus”
  5. Find Music You can fill Google in with codes that work with everything you are looking for. They are able to change the search engine in a powerful Search Operator. Here is the piece of code: -inurl:(htm|html|php)intitle:”index of”+”last modified” + “parent directory”+ description + size + (wma|mp3) “frank sinatra” Of course you can search something else instead of Wma, mp3 files, and you look for any other singer instead of Frank Sinatra.
  6. Find definitions If you don’t know the meaning of a word, you can ask Google! Here is what you have to write: [define: serendipity]
  7. Calculator With Google it is not necessary to buy a calculator. In fact, you can calculate whatever you want within the search engine. Here is how: [100+758+23-254]
But Google goes beyond all that I have just written, and lets you search things in hundreds of different ways. Codes, Boolean search, special characters are just a few examples of what you can use with Google to fine tune your search and manage to look for something that, till some time ago, was really impossible for you to get. Let’s start this little trip by learning how Google works with the basic searches.
  1. [red white] Ok, I know, this is really simple but I want to start from here, from what you know to move towards those Google regions that will leave you speechless. This simple search will let you find those pages containing the word “red” and/or the word “white”. Nothing difficult so far, right?
  2. [red+white] This search will let you look for those pages containing the words “red” and “white”. This is a more specific request that will exclude a lot of unwanted results.
  3. ["red white"] This search will let you look for pages containing the exact sequence of two or more words that are to be next to each other and in the same way they are written. In this example, Google will look for “red white”. Nothing else will be taken into account.
  4. [red or white] This search will let you look for pages containing the words “red” or “white”.
  5. [red -white] This search will let you look for pages containing the word “red” but without the word “white”.
  6. [red ~ white] The little character you see here is called “tilde” and lets you look for pages containing the word “red” and whatever connected with the word “white”
I bet you already knew most of these tricks to search, right? But it is not over yet. Let’s go deeper and deeper in our quest for the perfect search with this tips and tricks, and let’s learn how to make specific requests to Google.
  1. [chocolate site: cnn.com] This search will let you look for specific pages in the website www.cnn.com and containing the word “chocolate”.
  2. [intitle: chocolate: cnn.com] This search will let you look for specific pages in the website www.cnn.com having the word “chocolate” in their titles.
  3. [info: cnn.com] This search will let you look for all the information owned by Google about the website www.cnn.com.
  4. [link: cnn.com] This search will let you look for those websites that link to the website www.cnn.com.
  5. [cache: cnn.com] This search will let you see a copy of the website www.cnn.com stored in Google’s server.
Again, Google let you search for information about different things such as: movies, stocks, flight, weather etc. Let’s find out how:
  1. [movie: lord of the rings] This search will let you look for the reviews of the movie Lord of the Ring.
  2. [stock:goog] This search will let you look for Google stock exchange information.
  3. [weather New york NY] This search will let you look for the weather in New York.
  4. [fly New York to Las Vegas] This search will let you look for flight from New York to Las Vegas.
  5. [1260 New York Broadway NY] This search will let you look for a address in New York. It will also show you a map from Google maps.
Are you looking for sheet facts about cities, counties, people etc? Are you doing your homework and you are at loss about how to find specific information. Google can help you!
  1. [gdp italy] Gross domestic product of Italy.
  2. [population Italy] Population of Italy.
  3. [location Italy] It gives you an idea where Italy is.
  4. [capital Italy] The capital of Italy.
  5. [anthem Italy] The national anathem of Italy.
  6. [flag italy] The flag of Italy.
  7. [birthday of luciano pavarotti] The birthday of Luc
Read more
no image


Tips and Trick to Protect Your Blog and Bandwidth From Spam


Bandwidth
The bandwidth is the maximum rate at which data can be transferred over a communications network (Computers). This means that when a visitor reads a post in your blog he will actually download it in his computer using in this way part of the bandwidth your web hosting provider puts at your disposal. A lot of hosting providers give a certain amount of bandwidth per month. And you pay for it, don’t forget. If you exceed that quota your blog will be disabled for the rest of the month, only to be re-enabled during the next month (in the worst case). Also, if your blog and your scripts are not well-optimized they will tend to create slow queries and exceeded CPU Quota errors. What does it mean? It means that they use too many resources, too much bandwidth and this hurts other blogs hosted on the same shared server. Useless to say, sooner or later you will get the dreaded “This Account Has Exceeded Its CPU Quota.” message in the place of your blog frontpage. After all this, you will understand only too well how important is to optimize your blog and make sure that it uses as less bandwidth as possible. Here is a list of tips and tricks which work on WordPress. Some of them work for all websites indeed, since they are general advice coming from “technical common sense”.
  1. Cache your blog using world-famous plugins or PHP applications. If you have WordPress as CMS blog-platform, install WP-SuperCache. If instead you don’t want to use any plugin because they tamper your blog’s database or might create a conflict with other plugins, install XCache in your server. Read my guide on how to install this superb PHP cache application.
  2. Talking again about caching, there are other techniques other than the ones described above which are able to cache objects of your blog. Have a look at this article of mine and learn how to optimize your blog without installing anything, except a small code in your .htaccess file.
  3. In order to make your blog bandwidth-wise you should keep it as simple as possible. Do not install tons of plugins or widget on its pages, do not use too much ads and avoid those plugins which fetch RSS feeds from other blogs. Also, if you don’t use a certain plugin anymore, uninstall it and remove its footprints from the database.
  4. Don’t show a lot of posts and objects on your blog’s frontpage. This will decrease the time your visitors need to download it. This also means that less resources will be employed to load and execute it, also saving a lot of bandwidth.
  5. Resize the images you display in your posts. This will dramatically save a lof of bandwidth.
  6. Optimize your database at least once a week. If instead your blog doesn’t have a lot of visitors (let’s say under 1000 visitors per day), optimize it once a month. To do it, go to your Cpanel – PHPMyAdmin – Select/click your database (usually is located on the left of the main page) – a list of tables should appear, at the end of the list click Check All – from the drop down menu: With Selected: repair – again, from the drop down menu, With selected: optimize. Now, if you are smarty enough you can use a nice Cron Job command to automate the task. Here is the code to put in the Cron Job section: mysqlcheck -ao -auto-repair -u ‘database_user’ -p’your_password’ database Please, copy this code and don’t change anything. Only change the proper sections with the name and the password you assigned to your database .
  7. Switch to Fast CGI. To do it go to your Cpanel – PHP Config – PHP5 (FastCGI).
  8. Compress your blog’s page by enabling zlib option in your php.ini. Do do that, go to your php.ini located in your server, open it by using Notepad or your FTP client software, locate zlib.output_compression and set it ON. Locate zlib.output_compression_level. This option lets you set the compression level. -1 is disabled, 9 is the max compression. In order not to overload your server, it is HIGHLY advices to set it to 1 or 2 at most.
  9. If you run WordPress, try to tweak the Auto Save feature while writing a post. As a matter of fact, by default WordPress auto-saves your the post you are writing once every 60 seconds. Hey! This a real resource-eater feature! Read this article of mine on how to tweak the auto-save feature in WordPress.
  10. Beginning from WordPress 2,5 every time you modify a post, a post revision is saved in your database. This is especially helpful if your blog has got a lot of authors since it will let you know what was changed in a post, by whom and when, and revert it to a previous state, if necessary. The down-side is that post revision creates a lot of data in your database, ending up with eating a lot of resources. Read this article of mine on how to turn Post revision off and how to clean your database. This hack helped me greatly to optimize my database by making it lighter and deleting more than 12.000 rows!
  11. Disable Update Services in WordPress. Every time you post a blog, WordPress will try to notify (or ping) some site . This is resource consuming, also slowing down the posting procedure. Plus, if the website WordPress tries to ping is experiencing issues, the posting procedure will consume even more resources returning , in some cases, slow queries. To Disable the Update Service, go to your WordPress Admin panel – Settings -Writing – delete all the Web addresses located under Update Services and press Save Changes.
  12. It is always a good idea to keep an eye on how many queries your website is producing every time somebody opens a page. A general, good rule of thumb is having between 10 and 30 queries per page. Remember, the more queries your website produces, the more it consumes server resources. To find out the number of queries your website has got, insert this piece of code within your theme: num_queries; ?> .  . This code will display the number of queries the page is producing and the time to process them.
  13. Don’t use (or at least try to limit) plugins displaying related posts or latest posts links in your pages. Usually, these plugins create a query for each link they display and as you know, having a lot of queries is the latest thing we want. If you use WordPress and want to show the latest post at all costs, use a WordPress tag instead. Here is the tag showing you the latest post. This tag just creates a couple of queries, regardless the number of links it displays: 
     . Of course, the number 8 refers to the number of latest posts displayed in your blog. Other useful tags can be found here.
  14. Keep an eye on your slow queries. As a matter of fact, they contain useful information about where they comes from and what is producing them. Even if you are not an expert you will be able to get important hints. Remember, most of the times a slow query is caused by a not well optimized plugin. To gain access to your slow queries, open your website by using a FTP client software, go to the TMP folder, and open themysql_slow_queries folder. In the TMP folder you will also find the cpu_exceeded_logs folder containing detailed information describing when your blog hit and overcome its CPU quota. If you use a lot of CPU quota your web hosting provider will disable your blog sooner or later, asking you to optimize it. Do you understand now how useful is this trick?
  15. Get a better web hosting provider offering Dedicated or VPS (Virtual private Server) servers. A lot, if not the majority of hosting providers have shared servers to host blogs. This means that a lot of blogs will have to share the same resources on the same machines. Since majority of hosting providers tend to oversell their services, you understand only too well how a regular blog has to struggle in order to get its due resources. To complicate life there is also the fact that if a blog hosted on the same machine as yours is not well optimized or has got a resource-eater plugin, your blog, and your “neighbors” will experience slow performance (your blog’s pages and plugins won’t download very fast) also resulting in a lot of slow queries. In this case, your slow queries will come from anywhere and they will just be the result of a sluggish server fighting to equally share its remaining resources among hundreds of thirsty blogs!
Spam
So, your blog looks good, it’s hosted on a VPS server, it’s optimized, it doesn’t have a lot of plugins, it has been cached, tweaked, hacked in every possible way. Anyway, when you open the dreaded mysql_slow_queries folder in your FTP client application you see tons of slow queries! How is it possible? When you have done everything possible in order to avoid any issue in your blog and your server, what is left is the only possible, obvious answer which in this case has to be searched outside,  on  the Internet. The thing which makes your blog sluggish and thus creates a lot of issues, slow queries, exceeded CPU quota errors etc. is something which visits your blog repetitively, incessantly, inexorability looking for a “hole”, a flaw a small defect to inject its venom among your pages and posts. This things is called spam!
  1. Use Akismet. If you use WordPress such a nice plugin comes embedded with it. Akismet is the most powerful, easy, obvious solution to avoid spammers trying to post their comments in your blog.
  2. The bad thing about Akismet is that it lets spam comments reach your blog pages before being blocked. As a matter of fact, technically speaking a spam comment has to be posted before being detected by Aksimet. Only then the plugin will identify the comment as spam and will put it in its quarantine safe. Why this is bad? Because when spam bots try to post one of their comments in your blog they will wear out your server resources. In fact, they will frantically try to post their crap one, twice, one hundred times. This procedure, apart from slowing your blog down, will create a lot of slow queries and, in the worst cases,  will cause your hosting provider to suspend your blog for exceeding the CPU quota. One of the best ways to stop spam right in front of your blog’s threshold, so to speak, is the solution offered by The Honey Pot Project (Read my exclusive intervew to the Honey POt project here!). The script available in the website lets you insert, invisible links among your blog’s posts and pages. These links, which are particularly attractive to bad bots, lead to ad-hoc pages where a bot is identified, listed and caught!
  3. If you want to fight spam by yourself and keep track of all the nasty bad bots hitting your blog, a nice free solution is to place bot traps in your blog. A bot trap is a special page which must not be spidered or followed by spiders and bots. This result is achieved by placing a command in the robots.txt file in your server. The command I am talking about is this: Disallow: /bot-trap/ and prevents the trap page from being crawled. You have to know that good bots (like Google bots) usually follow the commands you put in the robots.txt file, while bad bots will  ignore them since they are constantly looking for some way to post their rubbish. After a bot trap is installed, next time a spam bot will spot your blog, it will jump the robots.txt file right away starting to crawl your posts and pages. Once it detects a link leading to the bot trap it will follow it of course, and at that point it will get caught. In fact, once the bot enters the trap page, its IP is recorded while a special command is placed in your .htaccess. The command (Deny from 195.70.62.72) forbids the bot from visiting your blog once for all. Web Talk uses the excellent bot trap available at Danielwebb.us.
  4. Sometimes, spam comes directly from an infected website which keeps crawling your blog and posting comments about wonderful medical treatments (ab0ve all about miraculous blue pills). The easy solution is to place in your .htacess file a command which blocks visitors by using their domain:# block visitors by domains
    RewriteEngine on
    RewriteCond %{HTTP_REFERER} kimsufi.com\.com [NC,OR]
    RewriteCond %{HTTP_REFERER} ovh\.net [NC,OR]
    RewriteCond %{HTTP_REFERER} musicxclusive\.net [NC,OR]
    RewriteCond %{HTTP_REFERER} windows-vista.shuublog\.info [NC,OR]
    RewriteCond %{HTTP_REFERER} 2009iweb1\.info [NC,OR]
    RewriteCond %{HTTP_REFERER} free500host\.com [NC]
    RewriteRule .* – [F]
  5. OK, that’s the last point which, despite is placed at the end of this article, should be adopted as a first spam countermeasure. To prevent spam and spy bots from crawling certain files of your blog containing sensitive information, just place these commands in your .htaccess file:# protect php.ini

    Order allow,deny
    Deny from all
    # protect .htaccess

    order allow,deny
    deny from all
    # protect 403.shtml

    order allow,deny
    allow from all

    # protect wp-config.php

    Order deny,allow
    deny from all

    # protect by disabling directory browsing
    Options All -Indexes
  6. Bonus 1: Hide your WordPress version from your theme. This won’t allow hackers and bad-bots know what WordPress version you have. This is particularly useful if you are running an old, buggy WordPress version. To hide the version tag, add the following code to your theme’sfunction.php file. :
Read more
no image


Change The Dock Right Click Menu Names


When ever your right click on a Dock item you will notice there is a list of items. Have you ever wondered how these items are created and if you can change them? Well you are in luck. This post will hopefully show you how you can change them to something a bit different. Its quite simple to do however you do need to err on the side of caution as you are altering system files. You only need TextEdit so it shouldn’t be too complicated.
1) To begin we need to find the file that the Dock is using to generate the names for the menu item. Open up Finder and navigate to /System/Library/CoreServices.
2) Right Click on item named Dock and select Show Package Contents and then navigate to /Contents/Resources/English.lproj if you are using a different language go to your respective language folder.
In this folder is a set of text files called strings. Strings essentially allow the program to name an item within the code and then assign a different language to that name. This ensures an item named “Quit” says “Quit” in English and “Salir” in Spanish (I hope Google Translate worked correctly). We are going to play around with this file so it can say something different.
3) Select DockMenus.strings and copy it to the desktop. While you are there may a second copy as a backup.
When you open this file you will notice something very specific. Every item is made up of two parts. One section in capitals, the other in normal textsurrounded by quote marks. The section in capitals is used by the background code so don’t change it. The section in quote marks is what you normally see so feel free to change it.
4) As an example find the item named QUIT = “Quit”; and then change the text in quote marks to something like QUIT = “Quit Application”;
5) Save the file on your desktop.
6) Copy this file back to the English.lproj folder found previously. You will have to authenticate the file movement with an admin password.
7) You are done, the changes should be instantaeous.
Some ideas which are rather interesting to implement. Anything with %@ in the quote marks will show the application name. Therefore you can write something similar to QUIT = “Quit %@” . This will show something like “Quit Firefox” when you right click on the item in the Dock.
Read more
no image


Auto-Complete Words On Your Mac


This is a rather cool quick tip that can save you a lot of time. Most modern search boxes now a days have a drop down auto-complete feature to help you complete words a lot quicker, this is generally useful and can save you some time and effort. Wouldn’t it be useful if you could expand this auto-complete feature to more text boxes around your operating system. Thankfully you can. Simply press Command + Period (or full stop) and your Mac will bring up a list of words which you can use to complete the word you are typing.
This drop down menu appears in pretty much any text box areas such as Mail, TextEdit to name a few. You start typing a word, press Command + Period and a list will appear that you can scroll through and use to complete the word you are typing. Useful if you have a long word that have a very specific start and you don’t want to type the whole thing out. You can scroll through with the arrow keys and select your work with either the tab or return/enter key.
Unfortunately this auto-complete doesn’t quite work like the one on Google’s search box. If you bring up the menu and then start typing the menu will disappear, hopefully this feature will be improved in new versions of the OS. Having said that, words you auto-complete frequently will appear at the top of the list as well as words already in the document or text box you are using, allowing you to save those few partial seconds. Its seems this feature will only work with certain textbox area and fields so try it out in different text areas and see what happens.
An intereting feature that I just found out and thought you might be interested in. If you want to learn more this is the sort of trick that appears in Mac OS X Snow Leopard: The Missing Manual.
Read more
no image


HOW TO: Hide Status Updates From Certain People

Using Facebook’s general privacy settings (find these by hitting “account” on the top right of a Facebook page) you can select whether everyone, just friends or friends of friends can see your status updates. However, there is a way to narrow those options down even further.

You can select specific friend lists to see your status (relevant for work, special interest groups, etc.) or even individual people by name, which is useful for anyone organizing a surprise party.
To take advantage of these options, click the padlock icon just below your “what’s on your mind” box on your wall and a drop down menu should appear. Selecting “customize” will bring up more options such as “make this visible to” and “hide from” with the option to make your selection a default.

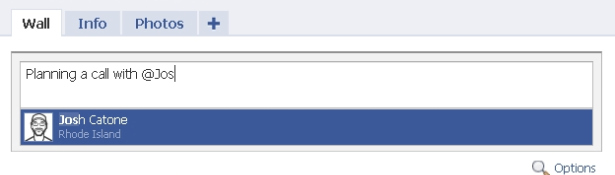
HOW TO: Tag People in Your Status Updates

Using Facebook’s general privacy settings (find these by hitting “account” on the top right of a Facebook page) you can select whether everyone, just friends or friends of friends can see your status updates. However, there is a way to narrow those options down even further.

You can select specific friend lists to see your status (relevant for work, special interest groups, etc.) or even individual people by name, which is useful for anyone organizing a surprise party.
To take advantage of these options, click the padlock icon just below your “what’s on your mind” box on your wall and a drop down menu should appear. Selecting “customize” will bring up more options such as “make this visible to” and “hide from” with the option to make your selection a default.

HOW TO: Play a Trick On Your Friends in Your Status Update


We have a funny one to end on — a way to play an amusing trick on your Facebook buddies.
This clever link “http://facebook.com/profile.php?=73322363″ looks like it could be a URL for anyone’s Facebook profile, actually takes anyone logged into Facebook to their own profile page.
If you try it out, be sure to remove the link preview that Facebook auto-ads. Have fun, and don’t be too mean…
Read more
no image


Steps to Increase your Google Page Rank.


Google Page rank is based on back links. Back links are Links pointing to your website from another website. The more back links you have the higher your PR will be.
1. Join forums, forums are a great way to achieve links to your website. In most forums you are allowed to have a signature and in your signature you can put a link to your website. But another important note to look on is making sure the forum is somewhat related to your website. You will still get credit if it’s not, but if it’s related to your website than you will be accomplishing two tasks at once.
You will be advertising for your website (bringing in targeted traffic) You will also be building your websites presence.
Your websites presence is very important to your survival. The more people see, or hear about your website the more credibility you will have and this increases your chances of having these visitors come back and possibly become leads.
2. Submit to search engine directories. Search engine directories are a good way to get a free link to your website. They also increase your chances at being listed higher on popular search engines like Google, and overture.
Most search engine directories allow you to submit to their website for free. This will allow you to increase your web presence by being listed on another search engine, and it will also be a free link.
Remember the more links you have the higher your PR will be
3. Using ezine ads (or newsletters). Creating an ezine will probably be the most beneficial step you can take to increasing your web presence. When you create an ezine you will be able to keep visitors coming back to your website for more by using signatures and giving special deals.
Ezine’s will also allow you to increase your back links. By creating an ezine you can submit your information about your ezine to an ezine directory. This directory will than link to your website(thus giving you a free link).
4. Creating and publishing articles. Articles are an easy source of generating new traffic. You can include your signature in your article. This will bring in more traffic from article submission directories.
Your signature usually consists of 4 to 8 lines. Usually the first line would be the title of the website that you are trying to advertise. The last line would be the link to the website and the lines in between these would be a sales pitch to draw your viewers into your website.
5. Links from related websites. Gaining links from related websites can be one of the most frustrating tasks you can attempt.
Read more